
Learn how to Needle Punch
Needle Punching is a really fun way to create textured designs on fabric. It is much faster to learn than other fabric crafts such as embroidery, and you can make all kinds of artwork and fabric projects
What is Needle Punching?
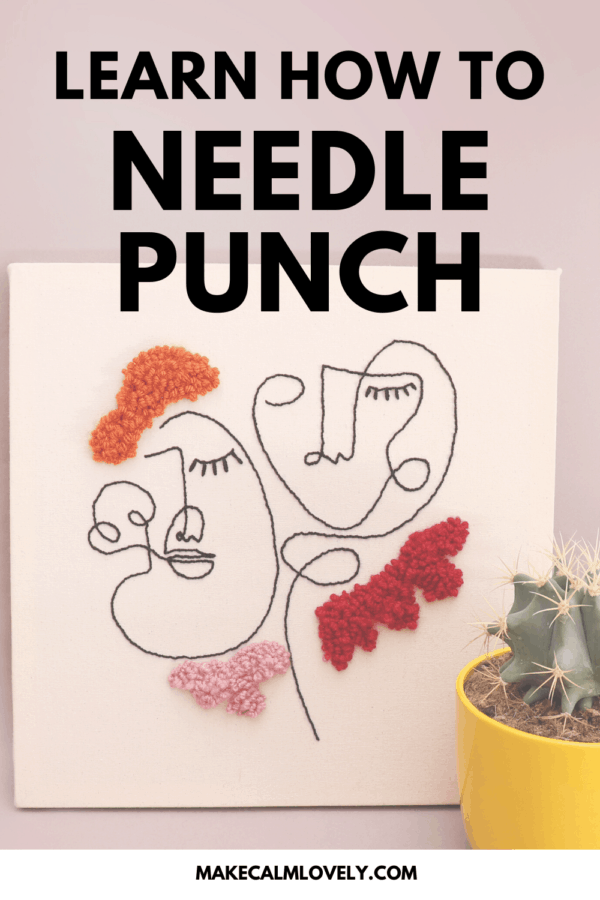
Needle punching is a form of embroidery that is very similar to rug hooking. Instead of regular embroidery, where a stitch is stitched actually through the fabric, needle punching punches the thread into the fabric, keeping the needle on the surface.
A piece of needle punching is a very textured design, made up of loops. Similar in look to a rug, it is highly textured.
This post contains affiliate links. You can view my disclosures here.
How to Needle Punch
Start out with a design that you want to needle punch. This can be anything at all. You will need to transfer the design onto the fabric you are using.
Larger patterns, with large blocks of color, are much easier for beginners. As you get better at needle punching you can explore much more complicated designs.
Supplies Needed for Needle Punching
A Punch Needle
A punch needle is a special needle with a metal tip. The metal tip has a hole through it, like a traditional sewing needle. You run thread or yarn through a channel in the needle.
A punch needle also has a handle, which makes it easier to hold and control the needle. There are different sized punch needles, for different projects you may be working on.

![]()
Fabric
Needle punching is done using a cloth called Weaver’s cloth or Monk’s cloth. It is a woven fabric of cotton and polyester blend that holds needle punched stitches in place.
Depending on the project you are making you will need to choose a heavier or lighter weight cloth. For instance a rug would use a heavier cloth, whereas a small picture would use a lighter one.
Thread
Most punch needling uses embroidery thread. This is thicker than regular sewing thread, and it has 6 strands that are twisted together. This is the same thread that is used for cross stitching.
Embroidery Hoop
Most standard embroidery hoops will work for needle punching. A heavier project may require a wood frame or more heavier duty hoops.

![]()
Other Tools Needed
Scissors, fabric markers or pencils, will also be needed for most punch needling projects.

![]()
Steps to Needle Punching
Transfer Your Design onto Fabric
Once you have selected the design you want to use, you will need to transfer the picture/design onto the fabric. You can use a fabric marker or pencil, or even a regular pencil for this. You can also use tracing paper for this.
You draw the pattern on the fabric in reverse. The drawing will be covered with stitches, so you don’t need to worry about it showing through the finished project.
When you needle punch you create a side of the fabric with looped stitches, and the other side has flat stitches. In needle punching it is the looped stitches that we want to see . Therefore that is why the design is drawn in reverse.
Attach the Fabric to an Embroidery Hoop
Once you have your pattern drawn on the fabric, attach the fabric to an embroidery hoop.
An embroidery hoop is made up of two hoops, a larger outer hoop and a smaller inner hoop. Place the fabric in the hoops and lock the hoops.
Thread the Needle
Punch Needling uses a special punch needle and embroidery floss. Embroidery floss is a thicker thread than regular sewing thread, and it consists of 6 threads twisted together, so it is much harder-wearing.
A punch needle comes with a special metal threader. You will need to push the metal threader down inside the punch needle.
You then thread the floss in the back of the metal threader. Pull the threader through the punch needle and remove the floss.
This is probably the hardest part of needle punching – learning to thread the needle. So here is a video that shows you how! Just practice until you get the hang of it.
Starting to Needle Punch
You will need to set the loop length you need using the slider that is on the side of the punching needle. The higher the number, the longer the loop.
You hold the needle just like you hold a pen or pencil. The bevel side of the needle should face the direction you are punching.
You start with the outlines of your design, and fill in the design row by row, before moving on to the inner parts of your design.
Here is a video that shows you exactly how to Needle Punch. Because watching a video is by far the best way to learn a craft.
Needle punching is a great form of embroidery to learn. You will have fun learning and mastering punch needling, and you can make some wonderful things for your home!