
How to take great photos for your Blog
As bloggers we have to wear so many hats, including that of photographer. Whatever type of niche you blog in you you will need photographs on your site. A site without photography in any shape or form would just be completely blah and bland. Photographs liven up your site, they reinforce the points you are making in your blog posts, they show your work, they show readers how to do things, they sell your stuff, and they just, well, look pretty!
Your iPhone CAN take great photographs!
You may think that for the best photographs for your blog you need to have an expensive DSLR camera, but that is absolutely not the case. DSLR cameras no doubt take expert photographs, but you may not be able to afford to purchase such a camera, or you may just be starting out and don’t want to invest in expensive camera equipment yet. Even if you do own a DSLR camera, sometimes you just want to take shots without it and the hassle of setting it all up. Whatever your reasons, your iphone CAN take good photographs!
iPhones take great top-down shots, such as those featured all over Instagram. iPhones are great for flat-lay photographs and top-down shots.
A simple editing app on your iPhone will enable you to edit your photographs to make them look more professional. VSCO is one such app that you can use. There are many more apps that you can use, some of them are free and do a good job.
The key to any photography is the light, therefore if you just learn the rules of lighting and photography, your iPhone photos can look just as good as those taken with a DSLR.
Learn about Lighting
As mentioned above, the key to great photography is lighting. Lighting is what makes your photos good or bad. It is worth investing some time in really learning about the best lighting for photography.
Make use of natural light. EVERYONE has natural light in their home, SOMEWHERE. There is no home without some form of natural light that can be used for photography. Northern facing windows are better for photography as there isn’t direct sunlight.
One of the keys to great white pictures is to use a Reflector. This can be achieved with just simple white foam board, held to the back of what you are photographing. Some people all make up a light box, which consists of all white sides.
Different light sources have different colors. Sunlight is actually blue – who knew! We always think of sunlight as yellow, but in our photographs it will come across as blue-toned.
You look at your photo set up on white board, and it looks white and pristine. But after you photograph it and look at your photo, it has a dreary grey tone to it. That is because what you see, and what your camera sees, is very different. There is a quick fix that is just so simple, but a lot of people don’t know about this – Exposure Compensation!
By using a reflector (simple white board) behind what you are photographing your shots can really come out great. There is a simple trick to holding up a white reflector board. Use frogs! These frogs are used by florists and others and really do work well for photography. Just insert your board edge into the frogs and it will stay in place!

Make your own props
All those pictures you see of bloggers and Instagrammers that appear to be taken in the most up to date, fashionable kitchens and places around the home are probably fake! And you can fake it too! I thought everyone had a better kitchen than me! I thought every blogger had a beautiful all-white kitchen that was sparkling clean and bright. But no – they probably just use props. You can so easily make your own props.
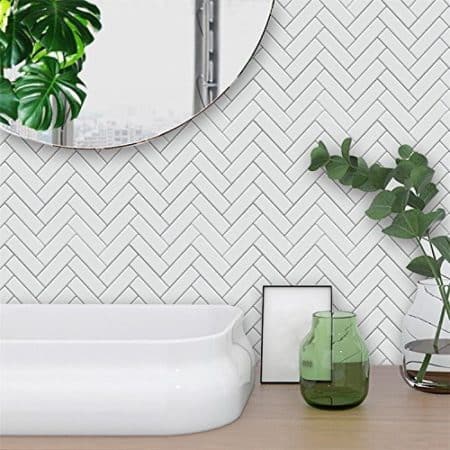
Make fake counter tops and work surfaces. Just by using a piece of board and sticky paper you can create gorgeous looking marble, wood or other material counter-tops, work surfaces and more. Need a nice tiled bathroom wall? Just get some stick-able tile paper and stick it onto a piece of board. Want marble countertops? Just get some foam board and stick paper onto it. (You may want to use this tool to really smooth the paper down well on the board).
Love this great bathroom look? It is all self adhesive wall tile!
Love this Subway tile backsplash? It is all peel and stick paper!

Love this marble countertop? It is all just peel and stick paper!

Style your photos for your reader
Take photographs with your reader in mind. If you are making granola for instance and your blog is aimed at business men and women, set up a scene showing it with them in mind. Style the scene and place the granola in the middle. You could place a newspaper next to the bowl of granola, a cup of nice fancy coffee, perhaps a business book they are currently reading. It is much easier for somebody to identify with something if it is personal in some way.
If you are aiming your blog at moms and showing a recipe for granola – show a table perhaps set for a family. Consider your audience and your reader always.
What you are wearing matters!
Did you know that the colour of the clothes you are wearing yourself when taking photographs can affect your photos! Colors can be reflected in what you are photographing. It is wise to just wear black when doing a photography shoot, or darker colors. Bright colors in greens and yellows can really reflect on what you are photographing.
Bear in mind short attention spans!
Did you know that the average person looks at an image for less than 30 seconds! Whatever you photograph is not going to be looked at for very long at all. Therefore that quick look needs to tell them all they need to know about the photo and what is being offered.
People have very short attention spans! Take Instagram for instance: How long do you actually look at a photo on there before you either hit ‘like’ or just skim over it? Not long! Your readers probably won’t be analyzing your photos in any depth, but they will react to a pretty nice picture.
Take a great class!
Education is always important and it is always good to further develop your skills and keep learning, and blogging is no exception to that. There are some great photography classes available online to really develop your skills and get lots of tips for better photography.
All the tips above I got from a photography class I took through Creative Live, Craft Photography Fundamentals.
CreativeLive have so many different video classes, but I selected something that was exactly what I needed: photography. And I am just so glad I did. Because after watching all 38 modules of the class (yes that’s right – 38 modules! but they are broken down into manageable chunks and you can watch all at once, or break your viewing up into several sessions), I really feel that I know so much now about taking photographs for my blog posts.
The class presenter is Candice Stringham, who is the marketing director of a major company and an editorial photographer. She really knows her stuff and she presents in an easy, relaxed style and shares so much great information and visuals. There are many photography classes on CreativeLive that you can check out. I learned so much from the class I took and I am embarking on many others!
THIS POST CONTAINS AFFILIATE LINKS. CREATIVE LIVE OFFERED ME THIS CLASS FOR FREE IN EXCHANGE FOR (MY HONEST) REVIEW. MY REVIEW IS NOT GUIDED BY THIS OFFER, MY OPINIONS ON THIS CLASS ARE MINE ONLY AND 100% WHAT I THOUGHT OF THIS CLASS